DIY Electric Car Forums banner

broken shaft/15 miles into 1st test drive

12K views 40 replies 9 participants last post by  alannasar  
#1 ·
My prior post is at this forum under "Im so new to this" .
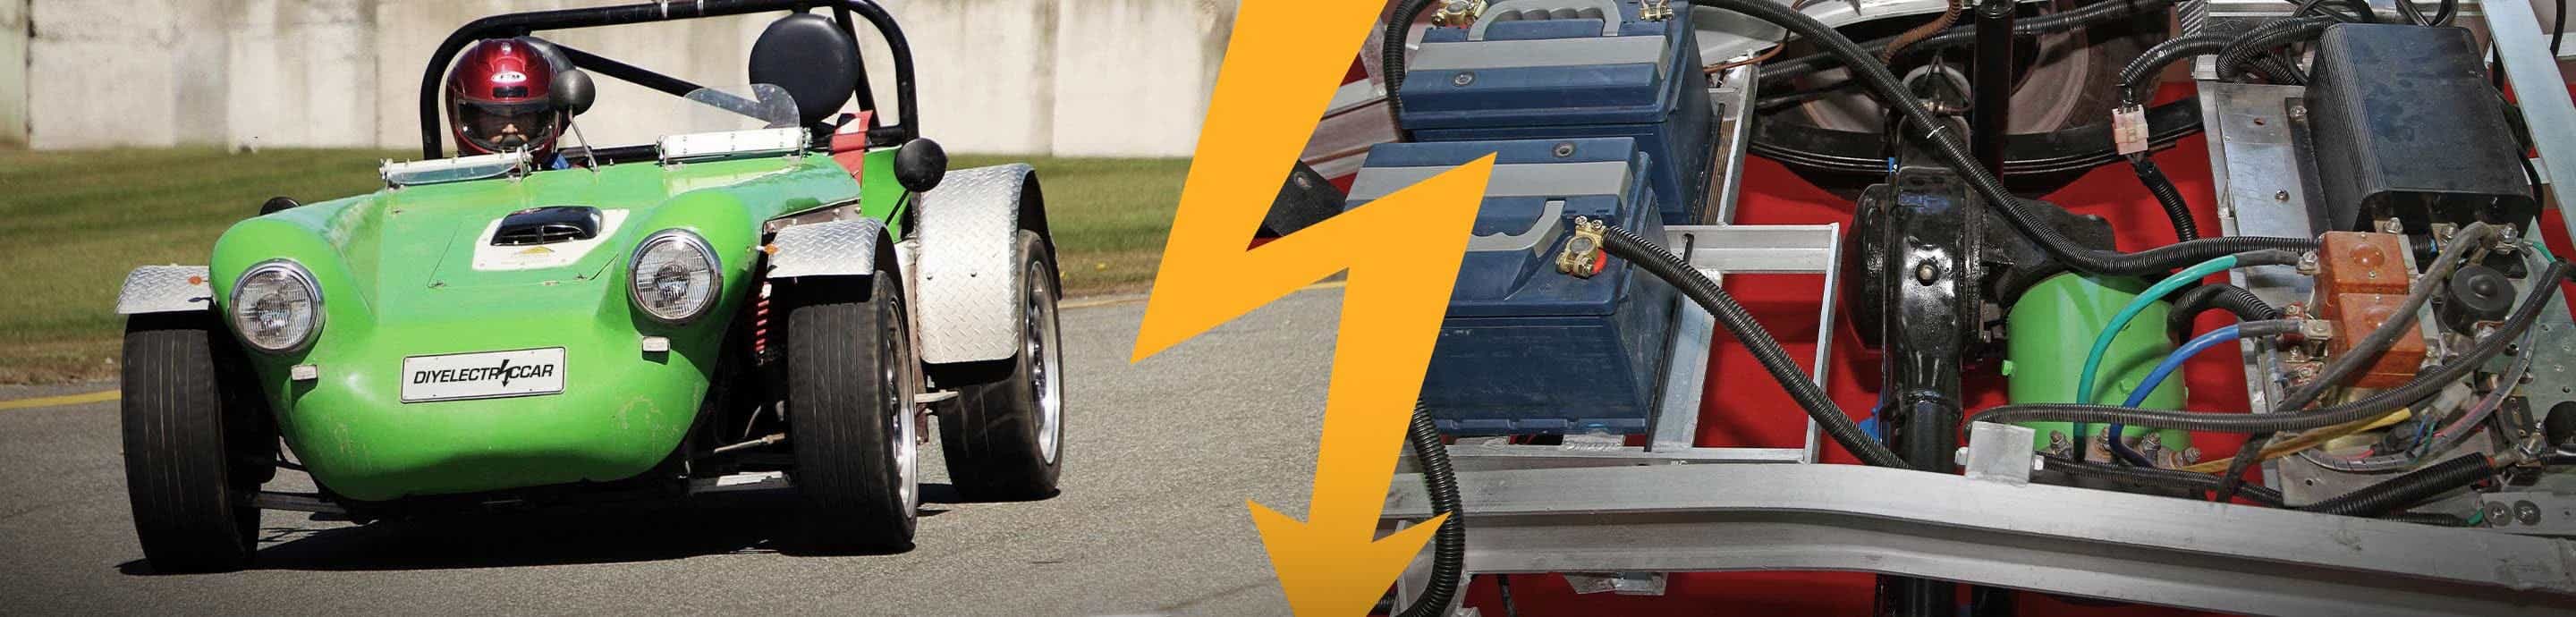
Well I got the car together and running:D with all the help from here .Thanks to all . But on my 1st run the shaft broke on the D&D ES-15a, motor model#170-004-0003. I wasnt going fast or driving hard just regular driving on the flat ground.
So I called wilderness EV and as usual they can help me but for $200 bucks. Has anyone taken one of this D&D electric motors apart :confused:? How hard is it to replace the armuatre shaft ?
Any ideas would help this is getting to expensive !. thanxs
 
#2 ·
I'm sorry to hear that, you have gone through such a steep learning curve to get where you are.:(

Are you sure the shaft has broken? Have you taken the motor out? If you have, do you have photos at all?
Maybe it isn't the shaft, perhaps the coupler has failed?

I think changing the armature shaft is not easy.
 
G
#3 ·
I can verify it's the shaft. He sent me a few photos of the mishap. Damn, and all that work and learning he has done. That makes for a real sour experience. But it is not hopeless. It is good that you got as far as you have. Figuring things out will only help you in the long run. Taking motors apart is not hard but you must be careful not to chip or bust the brushes and that you label all your parts and take photos along the way so you can put it back together when your ready to put it back together. If they send you a new armature you can install it yourself. You will need a bearing puller I assume but that is not terrible hard. I did that to a GE 9" I have. I took it apart and replaced the bearings and cleaned the motor. Still runs well. Did that job in a couple hours.

Pete :)
 
G
#4 ·
When you have it fixed be sure all the bolts are in place and tight. If you can run a stock flywheel and clutch I highly suggest you do that. A solid connection like you have can put a lot of stress on the system. If out of balance even a tiny bit you can do enough damage that over time you will get a failure like this. This is not the first one I have seen like this with a solid connection. I think that you ended up with a stress crack and it finally busted. The previous owner would have had this happen too had they kept the car. Its more than likely not your fault on this failure. I don't think its a failure on the part of the company that sold the kit either. But a solid connection is not the best. Some do just fine while ones like you have have had a history of problems. Your kit is not the best around. It does work but...........
 
#7 ·
The motor shaft is not aligned with the transmission shaft. This misalignement causes a bending moment, when the shaft rotates it gets work hardened and cracks, just like bending a paper clip back and forth. Take a picture of the cracked end of the shaft, you can get some info on how the crack propogated. Are there any voids?
 
#8 ·
Yes I am sure . I took apart the whole thing to get to the shaft. It broke right at the face plate of the motor. there is about 1 1/2 inches in the coup link still.

I do have pic's but for some reson i can't post them. Can I send them to you via email?
 
#9 ·
You should open up a photobucket account so you can upload pictures and link them more easily.
http://photobucket.com/
As has been mentioned your shaft probably broke because of misalignment, which could have occurred from an improperly made or improperly installed adapter plate. If you don't fix that problem a new shaft will also break.
 
#13 ·
You should open up a photobucket account so you can upload pictures and link them more easily.
http://photobucket.com/
As has been mentioned your shaft probably broke because of misalignment, which could have occurred from an improperly made or improperly installed adapter plate. If you don't fix that problem a new shaft will also break.
:) Hi JRP3 all we need is bill and we have a reunion hee hee. what would you recommend on the procedure on how to install a adapter plate?

p.s. i will go on to poto bucket . thanks
 
#14 ·
If it was designed and built properly installation should be fairly straight forward. Line everything up and go around tightening each bolt a little at a time. Then when bolting the motor and adapter to the transmission it should slide together fairly easily if lined up properly, and you then tighten those bolts in a similar manner. You might need to take your motor and adapter to a machine shop to check if the surfaces are true and the motor centered.
 
#15 ·
Image


This is how I got my plate built. Every dowel pin and bolt hole was located on the motor and tranny, the shaft centerlines are dead on.

If it was designed and built properly installation should be fairly straight forward. Line everything up and go around tightening each bolt a little at a time. Then when bolting the motor and adapter to the transmission it should slide together fairly easily if lined up properly, and you then tighten those bolts in a similar manner. You might need to take your motor and adapter to a machine shop to check if the surfaces are true and the motor centered.
 
G
#18 ·
Click on the upload button and it will open an window to your computer so you can navigate to where you keep your pictures. You should keep your photos in a folder so you can find it easy. Or directory if you us a PC. You need to know where they are on your computer. Try one photo first. It should be in .jpg format. If not convert it first then upload it. If you want you can hold the command key down while you select more than one photo then upload a group at a time if your computer and internet access is fast enough.
 
G
#22 ·
Or in the advanced reply box you can scroll down to the manage attachments button and select that. It will again open a window to your computer allowing you to navigate to the images you want to upload. It only allows one at a time but it works as long as the images are not to terrible large. Or you do as stated as above and link to your images via insert image. It requires the full url to work.

Like this: But it only puts it in full sized.

Image


This puts the image directly into the message.

This puts it into the attachment section and if the image is large it will put a smaller image you can click on and see the larger one.

I like the attaching the image better. Less obtrusive to the end user.
 

Attachments

#24 ·
You should be able to tell if the failure was due to misalignment (constant bending back and forth) or overtorque by looking at the end of the failed shaft. Overtorque will break at a 45 deg angle and will have a granular appearance. If there was a stress fracture then there will be semicircular scallop marks radiating from the origin of the fracture. If from misalignment them it most likely failed straight across.
 
#26 ·
That looks like misalignment to me. The shaft is spinning against a bending moment.
Fatigue stress starting at the circumference and working inwards until it sheared off. Then there are some rubbing marks from after the break.

You can actually see the rate of propagation of the stress failure. Slowly at the edge to about 1/4 radius then accellerating rapidly to about half radius and then failing pretty quickly after that.
 
#28 ·
That looks like misalignment to me. The shaft is spinning against a bending moment.
Fatigue stress starting at the circumference and working inwards until it sheared off. Then there are some rubbing marks from after the break.

You can actually see the rate of propagation of the stress failure. Slowly at the edge to about 1/4 radius then accellerating rapidly to about half radius and then failing pretty quickly after that.

Hi all - Thank you all for your input is been a real lifesaver for me.The inputs are always teaching me:). And I think Mr. Woodsmith and JR are right about the misaligment.
So today I went to the local eletric car show . There were only 5 cars there:(. But a whole lot of kind folks there who like here who are willing to help.

So armed with the knowledge from what I have learned from here and hopefully with some more help from here, I think I can fix the shaft in the motor myself. I will keep you all post and need your advice as I go along.


p.s. Thank you so much gottdi for posting the pictures. For some reason I still can post them even after I followed your directions. I will keep trying tho:eek:
 
#29 ·
The good news is that in your pictures there are no signs of a stress crack ( the cross section has a granular appearance all the way through). That means there was no defect in the shaft and the failure was due to a combination of torque and tension forces due to misalignment. Fix that problem and you should be ok.
 
#31 ·
Actually it would be easier if it were just a faulty shaft, then all he'd have to do is replace that. Now he has to replace the shaft and fix or build a new adapter plate.
LOL:D
That gave me a seriously good laugh at the differing view points of the same thing. Excellent!:D
 
#33 ·
delivery boy,
I did two things to solve my break problem. First I changed from a rigid connector between the motor and transmission input shaft, back to the original flywheel and clutch plate. The clutch plate allows for a fair amount of flex while still transmitting the power. By using the clutch it also is easier on my 60 year old transmission. Those old synchronizers are not used to trying to match a 100lb armature speed to the vehicle speed.

The second thing I did was to have a new adapter plate made that was much better built than the first adapter. My first adapter was steel plates welded to a steel ring by a high school graduate welder. Not much into calibration or tight tolerances. For my new adapter I had a trained machinist mill two 1" aluminum plates. One matched the tranny bellhousing. One matched the motor face. They were mated using guide pins and 8 bolts to precise measurements. The fit was perfect.

I also made sure that my motor is always supported on both ends. Previously, only the tranny end was supported if the battery rack was removed because the front of the motor was hung from a bracket under the battery rack. I built a bridge between the frame rails to carry the front of the motor full time.

If you want to continue to use a direct connection between the motor and tranny, then use a Lovejoy connector. It will allow a few degrees of deflection in allignment, and tolerate some minor eccentric movement in the shafts. Bottom line is for longevity, it's good to have some way to allow minor movement in either shaft to prevent failure.
 
#35 ·
delivery boy,
I did two things to solve my break problem. First I changed from a rigid connector between the motor and transmission input shaft, back to the original flywheel and clutch plate. The clutch plate allows for a fair amount of flex while still transmitting the power. By using the clutch it also is easier on my 60 year old transmission. Those old synchronizers are not used to trying to match a 100lb armature speed to the vehicle speed.

The second thing I did was to have a new adapter plate made that was much better built than the first adapter. My first adapter was steel plates welded to a steel ring by a high school graduate welder. Not much into calibration or tight tolerances. For my new adapter I had a trained machinist mill two 1" aluminum plates. One matched the tranny bellhousing. One matched the motor face. They were mated using guide pins and 8 bolts to precise measurements. The fit was perfect.

I also made sure that my motor is always supported on both ends. Previously, only the tranny end was supported if the battery rack was removed because the front of the motor was hung from a bracket under the battery rack. I built a bridge between the frame rails to carry the front of the motor full time.

If you want to continue to use a direct connection between the motor and tranny, then use a Lovejoy connector. It will allow a few degrees of deflection in allignment, and tolerate some minor eccentric movement in the shafts. Bottom line is for longevity, it's good to have some way to allow minor movement in either shaft to prevent failure.[ Love joy connection?
 
#38 ·
I am sorry that you feel like giving up because of a costly bad experience. It honestly shouldn't be like that though that doesn't mean it isn't cheap either.

It can be done cheaply with a bit of searching around and some making but it depends on what you can and want to do yourself.

Would you want to give it another go given what you now know about the possibilities? It doesn't need to be too complicated.

You should ask Wilderness what mileage they would have expected their conversion to run over it's lifetime and then request a pro-rata amount of your money back.:D

Don't take the failure to heart though. My only working EV is a scratch built compact tractor and I got maybe 200 yards and then broke the transmission, the only part I didn't make.
I am going to find another, stronger, transaxle and rebuild it while building my second EV.

The image was from Googling lovejoy coupler.
 
#39 ·
I am sorry that you feel like giving up because of a costly bad experience. It honestly shouldn't be like that though that doesn't mean it isn't cheap either.

It can be done cheaply with a bit of searching around and some making but it depends on what you can and want to do yourself.

Would you want to give it another go given what you now know about the possibilities? It doesn't need to be too complicated.

You should ask Wilderness what mileage they would have expected their conversion to run over it's lifetime and then request a pro-rata amount of your money back.:D

Don't take the failure to heart though. My only working EV is a scratch built compact tractor and I got maybe 200 yards and then broke the transmission, the only part I didn't make.
I am going to find another, stronger, transaxle and rebuild it while building my second EV.

The image was from Googling lovejoy coupler.
HI w00d:)- You know from what I have learned here I truly do believe I can build one , But this time no kit . I will just buy the parts . also keep the fly wheel . :p

Willderness still has not return:mad::mad: my call or my email. I know he wants to pro-rated. But I want all my money back!. The kit instruction just sucked.
 
#40 ·
All your money back would be good, your only losses would be the stuff you have had to do to get it right in the mean time.
If they ever get back to you then maybe negotiate on the pro rata refund if they are stubbon.
Suggest that the conversion may be expected to do 100,000 miles. You did 15miles.
Pro rata that and you only pay 0.015% of the cost. 99.985% of your money back wouldn't be too bad, better then nothing and sounds fair then.:D

Seriously, however, do you have anything like a trades descriptions act there? Something that would support you when you have bought goods not fit for purpose?
You would have good grounds given that D&D have said that yours is not an isolated incident.


I think that if you got the right advice, the right support and found a good local machine shop you could do your own conversion as many here have done.
 
#41 ·
I wanted to share similar problems with wilderness ev / e-volks.com. I bought a shaft coupler and adapter plate for a 71 karmann ghia ev conversion. The price was much less than other companies. The parts arrived and i thought they were poorly made but i fit my clutch to the shaft coupler as instructed. wheni put it on the motor i noticed a very significant wobble. It wasn't welded at 90 degrees to the shaft axis. see video:
https://youtu.be/TaeNGVOeFu4
I called Brian. It took over a week to get through. He said it was within specs but would take it back. I had to pay return shipping.He said he would send me a new one. Instead, he resurfaced the transmission side of the coupler. This caused significant material to be removed from one side and not the other. The result was a bad vibration due to it being out of balance. see video:
https://youtu.be/Zi9xfRzV9II
I took it to a local shop at my expense. It was over 40 grams out of balance. It was fixed for about $100.
picture:
Image

I'm glad i was able to salvage the parts but dealing with wilderness is very frustrating.
Review Wilderness EV: Buyer Beware