DIY Electric Car Forums banner

Attempting to hack a Chevy Volt Drivetrain

155K views 73 replies 31 participants last post by  mons2b  
#1 · (Edited)
Chevy Volt drivetrain

I actually bought the entire EV drivetrain from a 2013 Chevy volt with 7k miles. After 3 attempts of buying a new volt battery (paying for, waiting months, and then getting a refund from the dealer) I just went with a scrapyard unit. A few weeks ago I started tearing apart the Chevy volt pack and video taped the tear down and here are the links:

https://www.youtube.com/watch?v=00tTckGUv7I&list=UU1haWsGv-HcI10lapf4MBgg


It's my first time shooting and editing video so future videos should be better quality


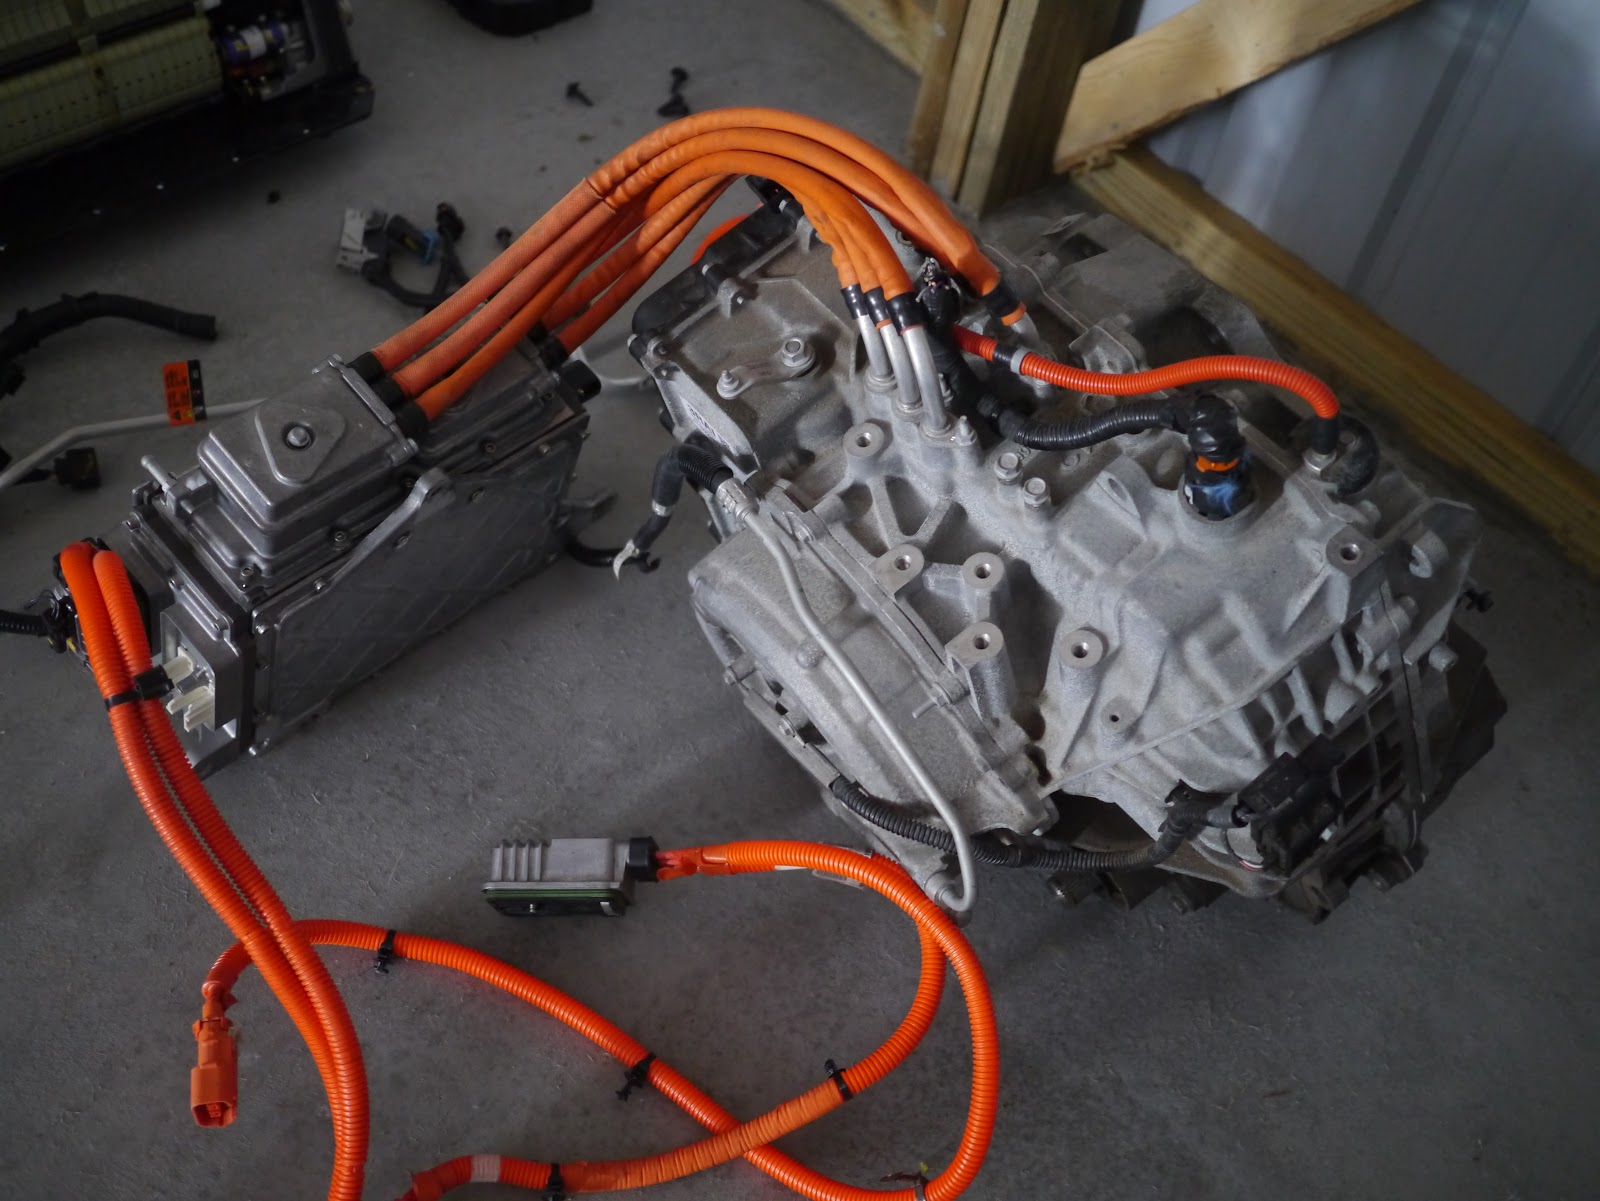
Here is a picture of the drivetrain sitting next to our daily driver volt (30,000 EV miles and going strong):​


When I bought all the parts I made sure to get all the important wiring bits.​


For those that don't know, the motor and inverter are very interesting, the motor is actually 2 motors. One is nested inside the other in a coaxial configuration and the inverter is actually two in one as well. It will take quite a bit of work to figure out how to talk to the inverter and very likely outside my capabilities (I am a ME not a EE for a reason :)
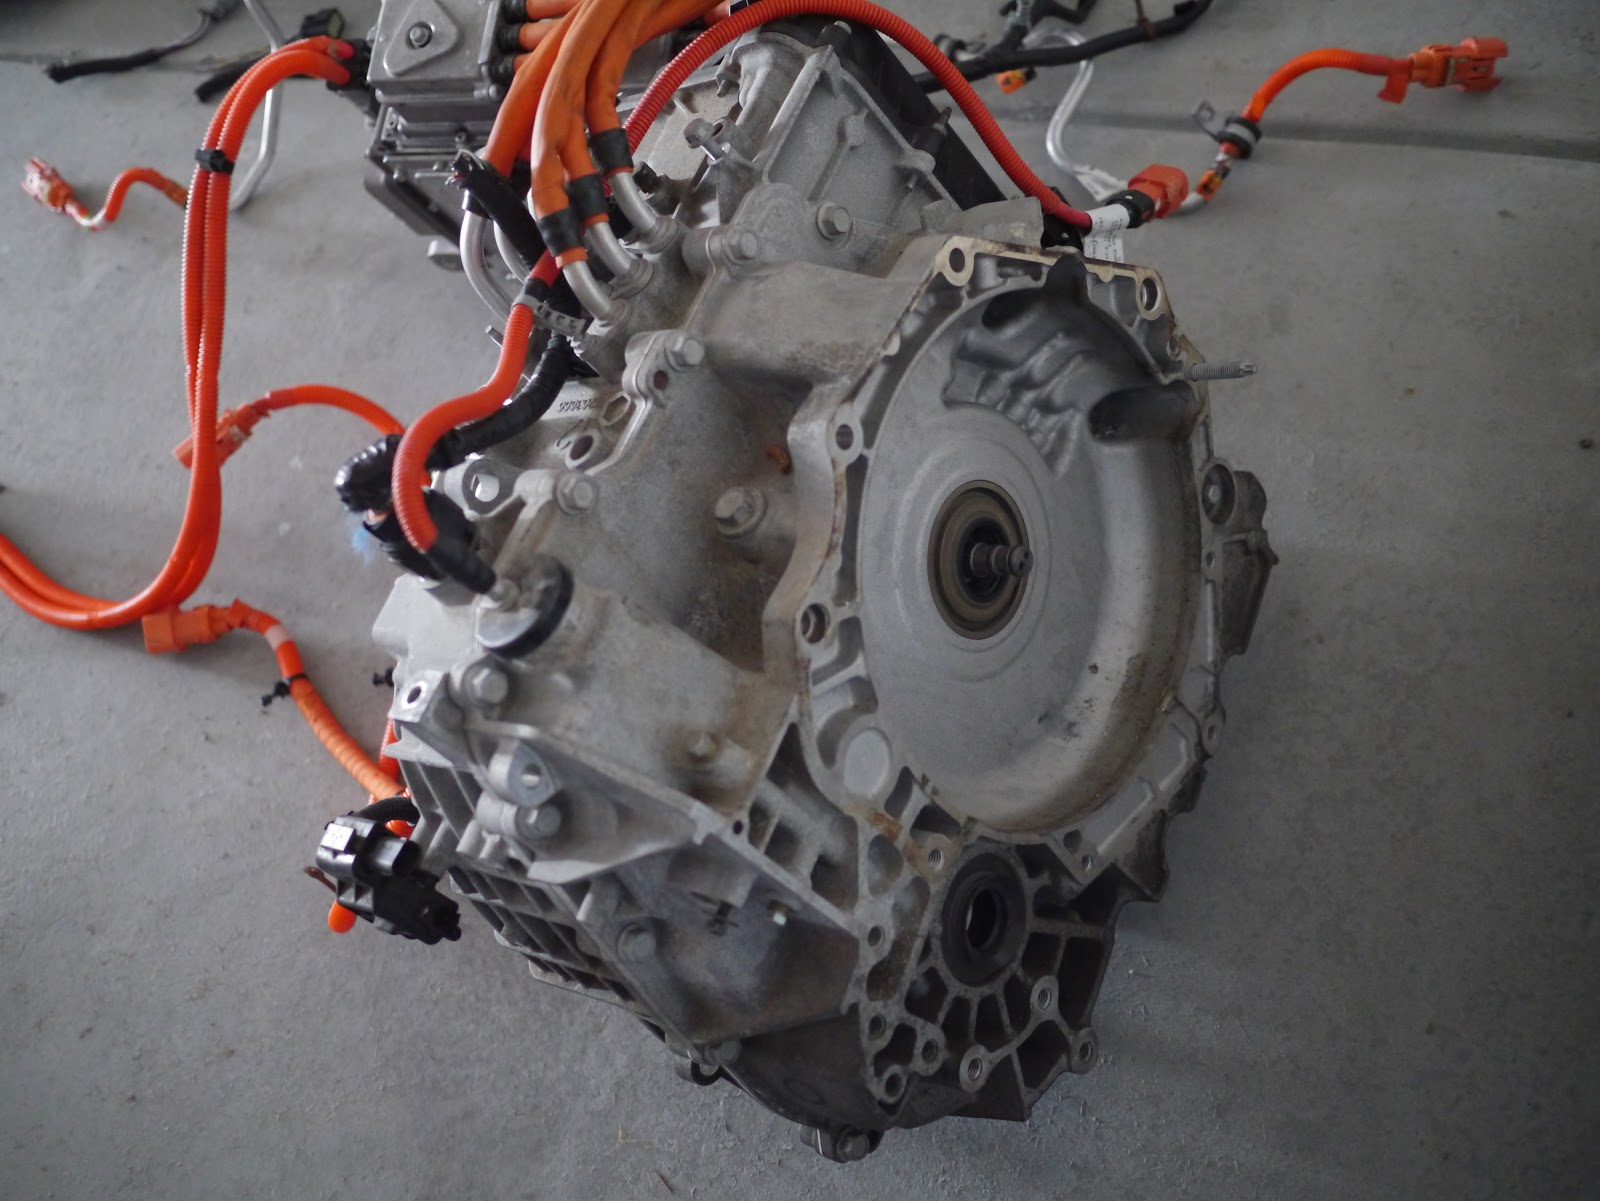
. But a 111kW AC drive system for well under $1000 is a big opportunity for the DIY community.​


Here is the engine side of the gear box. And on the bottom you can also see where the passenger side axle shaft comes out:​


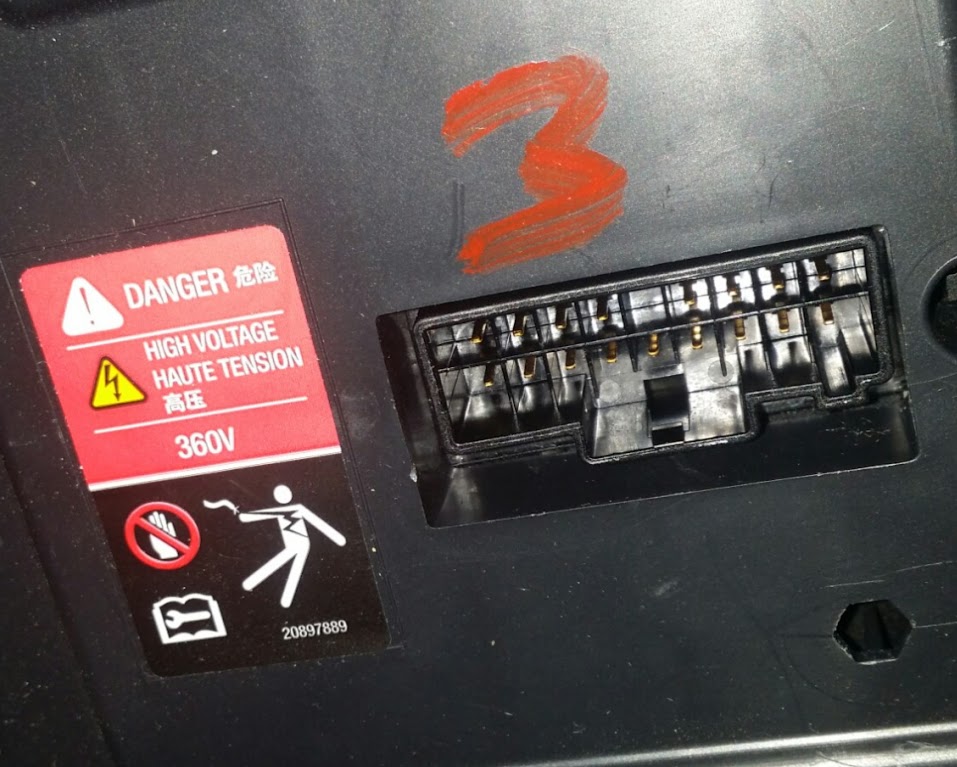
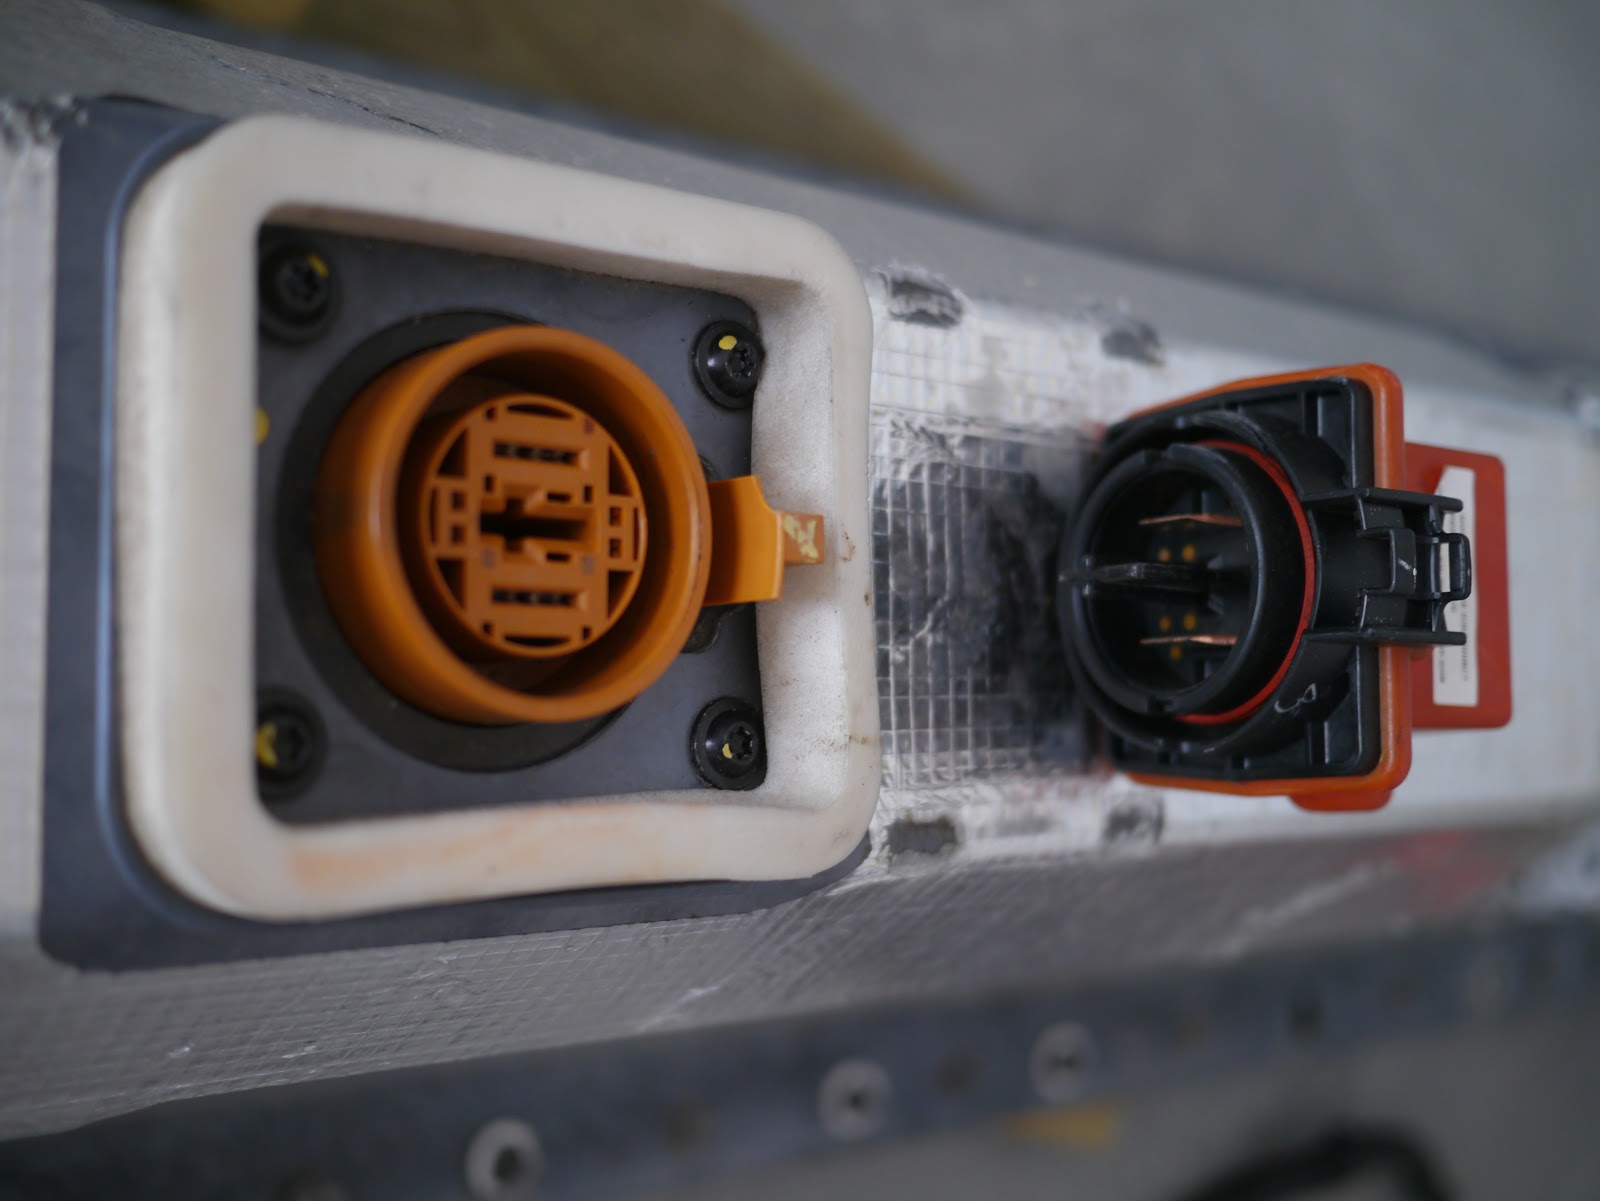
The Volt pack has a disconnect mounted on top. It is not the easiest to pull but I am pretty sure it is fused.​


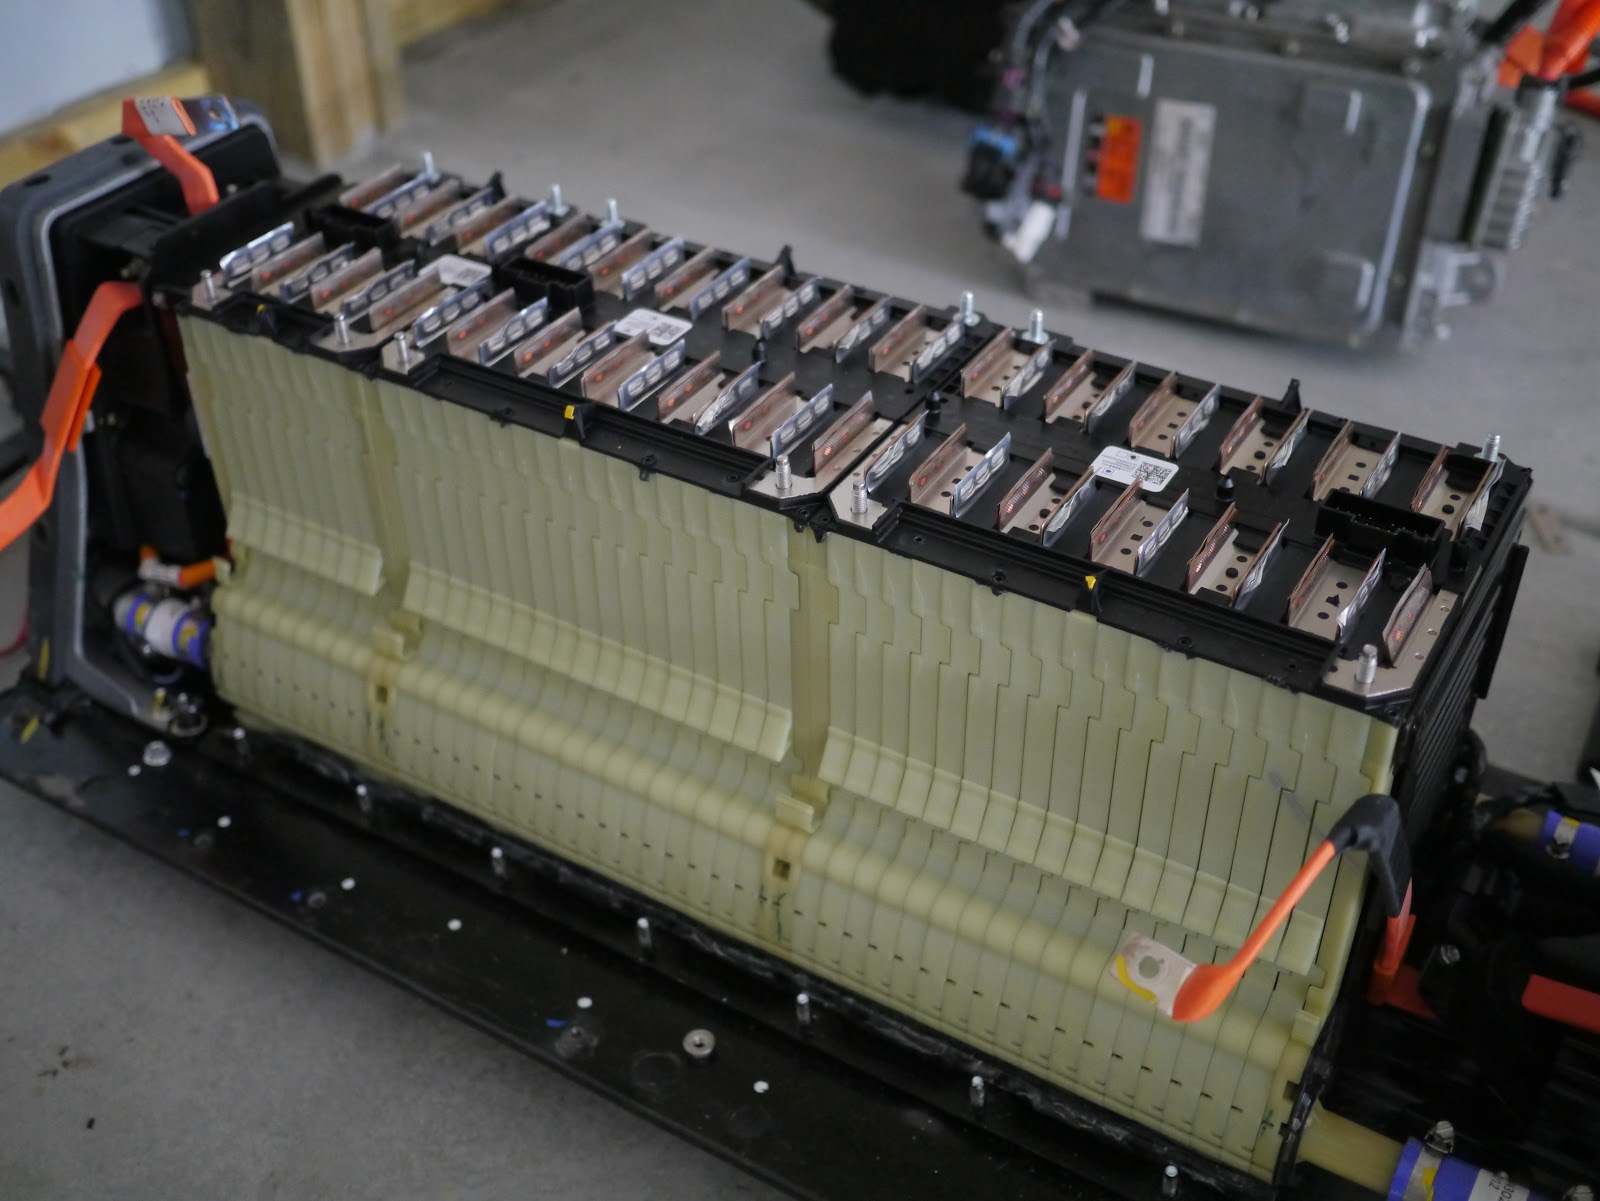
The pack cover is easily removed and the the whole pack is easy and straight forward to work on.​


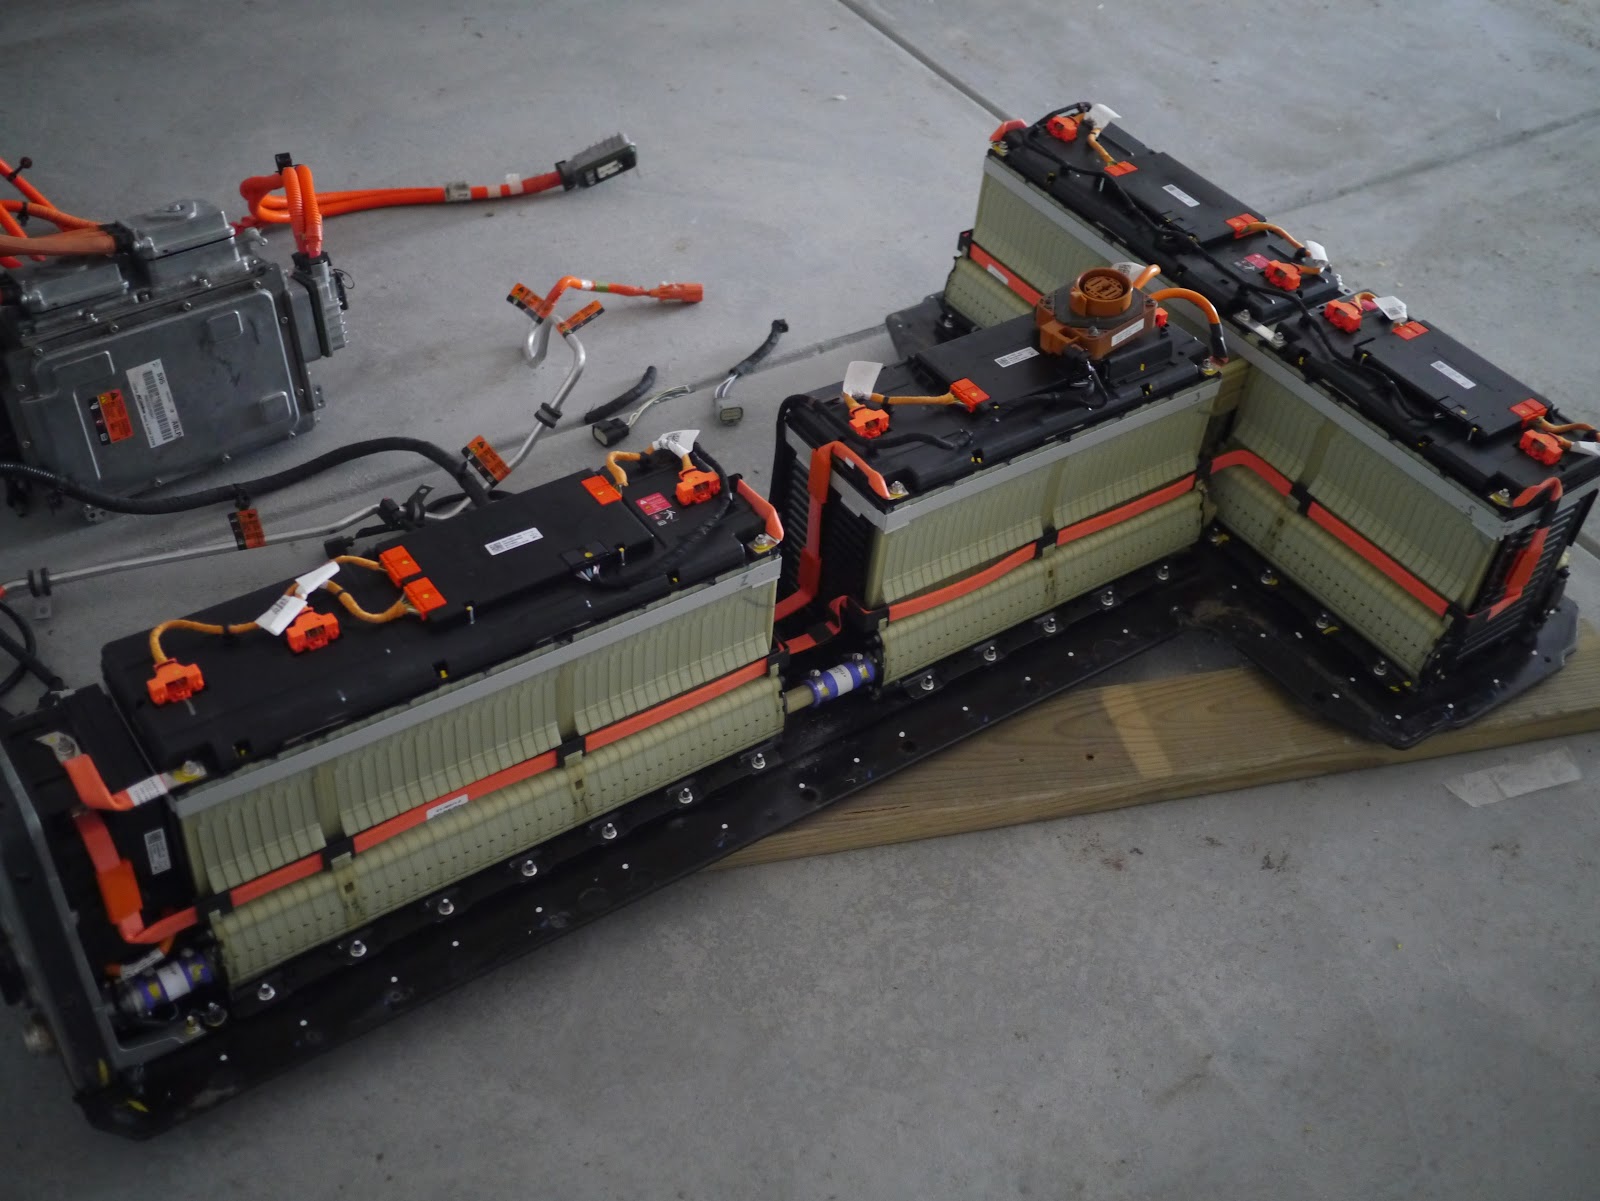
The pack is configured in 3 modules that are made up of 48V and 24V modules. The pack measured 370VDC total and is likely near a "full" charge. Keep in mind that chevy's version of a full charge is actually 80% SOC.​


I took video of the whole process and will post it up on youtube once I get it all edited. The modules are pretty easy to breakdown and I will upload the pics from that process next week.​
 
  • Like
Reactions: tom.lampros
#5 ·
I got it from a junkyard. It took me a bit because I didn't find one locally and it took a few attempts to find a yard willing to ship everything. Once I got a deal worked out on the battery the other parts were cheap. Even if I just end up scrapping the motor I won't be out much money. Because right now there is 0 market for them. If you wreck a volt enough to damage these parts it is going to be scrapped and with 8 year and 100k mile warranty there is no real replacement market.

As far as the BMS, I know there are some on the forum looking at making the OEM BMS work which would be very cool but in the mean time I want to wire it to my Orion. With the right harness it should be a simple plug and play from the Orion to the individual modules. I have been talking to a few people about buying a harness (including Andrew at Orion) but nobody makes this so I am designing up my own.
 
#7 ·
I'm guessing you have yours apart so you've seen the Orange bms tie points. Just whack the control board side off and add your own connection scheme. Just unplug them from battery first as I believe they are live. Should even be a standard spec connector.
Yep. That certainly is an option. Ideally a cable could be made available that would allow anyone to plug straight from the modules to the Orion without even picking up a wire crimper.

I have been searching for a connector but in the mean time I could just depin the original connector a repin it.

Here are pictures of the 6 and 12 modules.


Also I forgot to mention that there is a current sensor located in between the front and middle modules


#11 · (Edited)
Thanks. If you can upload the .pdf that would be great! I have not noticed the heater yet. Where is it located?

Each module has a TC. Not sure what type though? (maybe a thermistor for all I know yet)
 
#9 ·
kerrymann,

I'd like to use the Volt pack, but I'd like to break it up so get 190V and twice the Ah.
Question: Do you think the inter-module cabling can handle more than 300 Amps?

Looks like inter-module connections include HV cabling, cooling fluid and BMS cabling. Am I right or is there more to it?

Thanks. You are doing an excellent job at documenting this effort. Can't wait to see the vid.

Eric
 
#10 ·
You could actually do that pretty easily. There are 7 of the 48v modules and 2 24V modules. They can be reconfigured into 2 192V packs (or 4 packs depending how it will be cooled) in parallel. The design of the modules will not handle high currents but putting in parallel will double the current and get you the voltage you need.
 
#23 ·
Thanks!

The way the Prius (at least the older 2004 version jddcircuit has) works is dead stupid. I cannot imagine how anyone could make a setup like that and sleep at night. The Toyota engineers should be ashamed. I also cannot imagine that a nearly new Volt would work like that at all. CANBus control of vehicle hardware is very common these days and would be a fairly reasonable guess. Canbus works over two wires and at very low voltage (around 0 to 1.4V differential between the wires). Unfortunately, without a schematic it could be interesting to find those two wires if they even exist. They would likely be twisted together and needn't be very large.

If it is canbus controlled (and I'd be 90% sure it is) then I just might know somebody who likes to hack on canbus controlled hardware. The hardware and software exist but tend to be expensive. There are, however, people who are working to change that.

What I'm really trying to say is: I helped build a replacement ECU for electric cars and I've also been turning that same ECU into a reverse engineering tool to crack new hardware. After the comm scheme is reverse engineered the same ECU used for the reverse engineering is then re-flashed to actually drive the hardware. This should save time and money and lead to less wasted hardware.
Sounds good to me. What to work on one for a volt? I am still trying to get a hold of a wiring diagram and hopefully it is all canbus but we will see. I have been busy in the barn dealing with permit issues upgrading my barn with 100amp service but that is another story.

Looks like Jack posted parts of my videos on EVTV but there wasn't much lead in. I was hoping that would help get people interested in cracking the wiring of the inverter but I think he has more projects then can handle as it is.
 
#14 ·
#15 · (Edited)
And here is a great video that i just found where GM shows how the volt system works:

https://www.youtube.com/watch?v=AX5ZwzNwTc4

Much better job then I would have done with some shaky camera video pointing at things under the hood.
 
#17 ·
Not really. Take the engine out of the mix and you only have 2 modes and there is nothing that says that you can not just operate in one mode.

I started this for the battery and the price for the rest was too good to pass up. Trying to get the inverter and motor is a long shot but rewards are not without risk.
 
#19 ·
kerrymann,

Are you sure that the Volt inverter interface is CAN bus only? The Prius inverter/motor that I am using does not use CAN bus and hacking it is very different than just CAN decoding.

Have you come across a wiring diagram of the Volt? This might give some insight into the interconnections and type of hacking required.

Thanks
Jeff
 
#20 ·
No I am not sure at all. That is in fact my biggest concern. I have not found any wiring diagrams yet but right now I am focused on the battery. I am worried that the only way to get it work is if it can communicate with all of the other controllers on board. You see this a lot in engine swaps and it is can be a mess unless you can reflash the ECU.
 
#25 ·
According to people on the volt forum, these guys are supposed to have wiring diagrams for the volt but I have been trying to sign up for a account for the past week with no luck:

http://www.autocats.ws
 
#27 ·
Hello! this is a message to the moderators!
There should be a new title in the forum for hacking oem ev's, where everyone who has tried or has info on oem ev parts, because that is our future as DIY. It is the cheapest route out there and we end up with high qulity parts from junk yards for peanuts!
Example; I called around and a battery pack out of a volt or leaf goes for around $2000, and that's without negociation because they have no idea what to do with the stuff! Imagin if we could use everything from a leaf or volt, motor, charger, battery. We could make a sub $10,000 quality ev!
 
#28 ·
Hey all,
Sorry for the lack of updates. I realized I haven't posted anything here but I did crack a lot more into the volt pack and started putting up more videos of what I found along with progress on the e30:

https://www.youtube.com/user/d55guy/videos

I will be putting up more this weekend.

I am working with Jack's group on reverse engineering the components taking captures from my 2013. They gave me a candue and it is a bit of a learning curve on the CAN but things are progressing. It really helps having my volt that I can use to sniff the canbus while doing specific operations.

I have spent most of my time on the battery side. I have stripped down a few packs and developed my own mounting system. I was so anxious to test it all I pulled the enerdel that I just put in my e30 and put in most of a volt pack and wired it all up to my Soliton1. If I can get a throttle figured out this weekend I hope to take it for a test spin.
 
#29 ·
Hey all,
Sorry for the lack of updates. I realized I haven't posted anything here but I did crack a lot more into the volt pack and started putting up more videos of what I found along with progress on the e30:

https://www.youtube.com/user/d55guy/videos

I will be putting up more this weekend.
Thanks for the work you're putting in the videos!
I'm just going through the videos related to the battery - you got some things a bit wrong, so I would like to clarify it (didn't finish watching it all yet).

Battery interface module:
- The big ceramic white resistors are not heaters, they are precharge resistors. They are used together with a precharge relay (one of the small relays) and a MOSFET PWM, to ramp up the voltage before the main contactor turns on (so you don't get any sparking).
- One of the water connectors contains a HV heater (working from a pack voltage), again, controlled by one MOSFET
- All precharge, heater and contactors can be controlled externally, not using BMS module (it does not interface to it at all). Using X1 and X2 external connectors

I did reverse engineer most of the Chevy Volt drivetrain, but I'm still analyzing bits here and there, so I didn't want to release an incomplete documentation. Write me a PM if you want to cooperate on it.
 
#31 ·
Heater is in the passenger side water cooling manifold. 2 pin Orange connector going to relay module ( I think, mine is scattered).

Relays are good for average 10 amps on the small, 350-400 amps on the big mains, 600ish break on a one shot over current event. Nice panasonic hydrogen suppressed contacts which disassemble using a torx

Flat oem wires good (so far) 250 amp. I got nervous and yanked them.

Current sensor between module 1 & 2 is a 2 part hall sensor good to 400 amps or 20 amps. Rubber center plug. Offset is 3.80, voltage declines to 0. I am running it on 5 vdc, goes to 12. Building an inverted opamp to drive my jdh 404.
 
#32 ·
Hey folks. We are getting ready to purchase a Chevy Volt battery pack from a pretty new wrecked volt (was hit in the front). Since they just got the whole car in, we were wondering if there are any other bits and pieces that it might be worth pilfering from the car. Cooling pumps, contactors, heater etc??

Thought you all might have some insight after digging around in these parts for awhile. Any bits and pieces that might be nice to have around for our build? Thanks so much for putting in all that work!

Build thread here:
http://www.diyelectriccar.com/forums/showthread.php/planning-1985-vw-doka-conversion-140210.html
 
#33 · (Edited)
Depends on how you get the car. If it is your car with complete access, then everything you might think you need. If it is their car and you are buying parts that they yank, power steering pump, battery coolant pump, battery charger control module, A/C compressor pump, both ends of any harnesses for the modules you buy. All the contractors that are worthy are in the battery, everything else is CAN controlled. The wrecking yard is going to hacksaw or cutting torch stuff out, cut harnesses, and just generally booger up the removal unless you are there to supervise. Make sure you get the disconnect safety inert plug from the top of the battery, I hear chevy is prissy about selling replacements.

GET THE VIN # !!!!!! That helps the dealership sell you stuff.

BTW us old guys call that a combi
 
#34 ·
Besides the obvious stuff get the charger on the passenger side front bumper if It is not damaged (Often it is). It has been hacked and its a nice unit.

There is the DC DC converter in the trunk which can put out some serious power.
The J1772 inlet is a good quality one. Check the truck for a 110v charge cord. The volt has EPS so useless you can make the whole rack work the power steering won't be easily used. The heater is a good one too and I just picked one up to start hacking (100 bucks). I would pick up the coolant pump and heat exchanger for the battery system. Definitely get every wiring connector for every part you buy withth a min 6" pig tail.
 
#43 ·
Besides the obvious stuff get the charger on the passenger side front bumper if It is not damaged (Often it is). It has been hacked and its a nice unit.
OK this is awesome. I was just thinking about what I should do for a charger... I am planning on using chevy volt battery packs for my rx8 conversion.

Where can I find the hack information on the chevy volt charger?? What hardware do I need to get it to work?

Thanks for any info you can give!!

I watched your vids on the volt battery BTW and I am convinced to go that route. The performance and the savings over LifePO4 is too good to pass up. 600KW should be enough lol :D:D
 
#35 ·
I got a round to putting up some more videos. People kept asking me about how and where to get them:

https://www.youtube.com/watch?v=RbcbhGPp2PQ

And also I got some good information about the power capability of these volt packs courtesy of the DOE:

https://www.youtube.com/watch?v=HYrhykqpyj4

Sorry in advances as they are kind of long an rambling but if I waited around to edit them they would never get posted (not unlike the other hours of video sitting on my hard drive)

I hope they are helpful,